Battery switch on travel trailer function is crucial for managing your RV’s power. This guide unravels the mysteries of your travel trailer’s battery switch, from its basic purpose to advanced troubleshooting techniques. We’ll cover different switch types, safe connection practices, common problems, and essential maintenance tips, ensuring you’re confident in handling your RV’s electrical system.
Understanding your battery switch is key to preventing costly damage and ensuring a smooth and safe camping experience. Whether you’re a seasoned RVer or a first-timer, this guide will equip you with the knowledge to keep your travel trailer’s electrical system running smoothly.
Connecting and Disconnecting Batteries
Properly connecting and disconnecting your travel trailer’s batteries to the battery switch is crucial for safety and the longevity of your battery system. Improper handling can lead to sparks, explosions, and damage to your equipment. This section details the best practices for safe battery management.Connecting and disconnecting your batteries involves straightforward steps, but adhering to safety protocols is paramount.
Always remember that automotive batteries contain sulfuric acid, a corrosive substance, and generate explosive hydrogen gas.
Battery Connection Safety Precautions
Before connecting your batteries, ensure the battery switch is in the “OFF” position. This prevents accidental shorts or unintended electrical flow. Next, inspect the battery terminals for corrosion. Clean them with a wire brush and baking soda solution if necessary. This improves the connection and reduces the risk of sparking.
When connecting the cables, always attach the positive (+) cable first, ensuring a secure connection. Then, connect the negative (-) cable. Tighten all clamps firmly, but avoid over-tightening, which can damage the terminals. Never force connections.
Battery Disconnection Safety Precautions, Battery switch on travel trailer function
To disconnect the batteries, reverse the connection process. First, disconnect the negative (-) cable, then the positive (+) cable. This prevents sparks that could ignite any accumulated hydrogen gas. After disconnecting, store the cables neatly to avoid accidental contact or damage. Always ensure the battery switch is in the “OFF” position before leaving your trailer unattended.
Potential Hazards of Improper Battery Handling
Improper battery handling can lead to several serious hazards. A short circuit can generate intense heat, potentially causing burns or igniting flammable materials. Hydrogen gas, produced during battery operation, is highly flammable and can explode if ignited by a spark from a loose connection or other ignition source. Sulfuric acid, the electrolyte in lead-acid batteries, is corrosive and can cause severe skin burns and eye damage.
Always wear appropriate safety glasses and gloves when handling batteries.
Safe Battery Management Checklist
Prior to any work on your battery system, always complete this checklist:
- Turn the battery switch to the “OFF” position.
- Inspect battery terminals for corrosion and clean as needed.
- Wear safety glasses and gloves.
- Connect the positive (+) cable first, then the negative (-) cable, ensuring secure connections.
- Disconnect the negative (-) cable first, then the positive (+) cable.
- Store cables neatly.
- Verify the battery switch is in the “OFF” position before leaving the trailer.
- Regularly inspect battery terminals for corrosion and clean as needed.
Following these procedures will minimize risks and ensure a long and safe service life for your travel trailer’s battery system. Remember, safety is paramount when working with batteries.
Troubleshooting Common Battery Switch Issues
Your travel trailer’s battery switch is a crucial component, ensuring you have power when you need it. Problems with this switch can leave you stranded, so understanding common issues and how to fix them is vital for a smooth camping experience. This section will guide you through identifying and resolving typical battery switch malfunctions.
Common Battery Switch Problems
Several issues can arise with your battery switch. These often stem from environmental factors or simple wear and tear. The most frequent problems include corrosion buildup on terminals, loose or damaged connections, and ultimately, switch failure itself. Corrosion can impede electrical flow, leading to poor performance or a complete lack of power. Loose connections create intermittent power, while a failed switch requires replacement.
Solutions for Resolving Battery Switch Malfunctions
Addressing these problems often involves straightforward solutions. For corrosion, a wire brush and a battery terminal cleaner are your best friends. Carefully clean all terminals, removing any green or white buildup. For loose connections, tighten all nuts and bolts securing the wires to the switch and the battery. Inspect the wires themselves for damage; frayed or broken wires need replacing.
If cleaning and tightening doesn’t restore functionality, the switch itself might be faulty and require replacement. Remember to always disconnect the negative battery terminal before working on any electrical components.
Troubleshooting Steps Flowchart
This flowchart Artikels the steps to diagnose battery switch problems:
Start
|
Is there power to the trailer?
|
Yes No
| |
Check all trailer fuses Check battery switch
| |
Yes Yes
| |
Power restored?
Clean terminals & tighten connections
| |
Yes Yes
| |
Problem solved Power restored?
So, you're planning a trip? Awesome! First things first: get yourself sorted with travel insurance. Check out Aon travel insurance for solid coverage. Once that's done, think about your travel essentials; for the serious music lover, a killer audiophile travel setup is a must-have to keep those tunes sounding amazing on the go.
Don't forget your chargers!
| |
Yes No
| |
Problem solved Replace battery switch
| |
End End
Diagnostic Table
This table helps pinpoint the source of your battery switch issues:
| Symptom | Possible Cause | Solution |
|---|---|---|
| No power to trailer | Blown fuse, corroded terminals, loose connections, failed switch | Check fuses, clean terminals, tighten connections, replace switch |
| Intermittent power | Loose connections, corroded terminals | Clean terminals, tighten connections |
| Battery drains quickly | Parasitic draw (something drawing power even when off), failed switch (allowing continuous drain between batteries) | Check for parasitic draws using a multimeter, replace switch if faulty |
| Switch feels loose or difficult to operate | Internal switch failure, damage to switch mechanism | Replace switch |
Battery Switch and Electrical System Integration
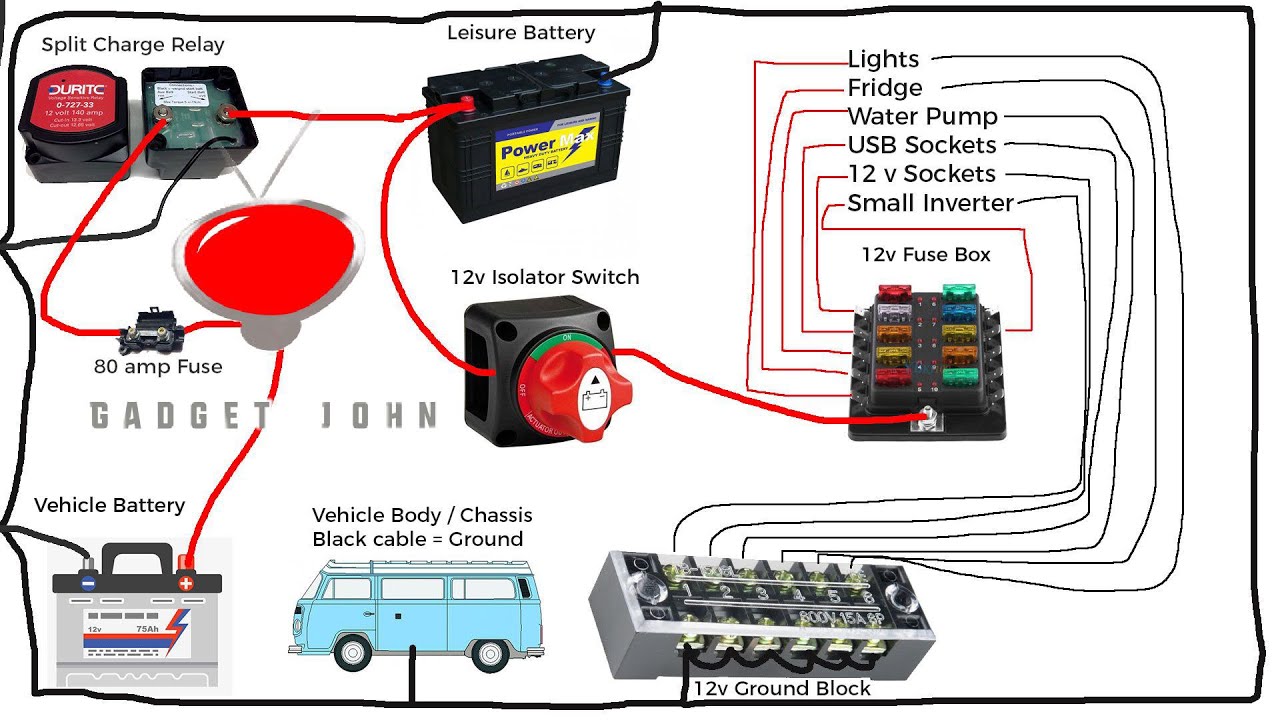
Your battery switch is the central nervous system of your travel trailer’s power, controlling the flow of electricity from your batteries to the various appliances and systems. Understanding how it interacts with other components is key to reliable and efficient operation. This section explains the interplay between your battery switch and the rest of your trailer’s electrical setup, highlighting different configurations and their performance in various situations.
The battery switch acts as a gatekeeper, directing power from your house batteries (or both house and starting batteries, depending on your setup) to the rest of the trailer’s electrical system. This system typically includes a converter (which transforms 12V DC power from the batteries to 120V AC power for household appliances), an inverter (which does the opposite, converting 12V DC to 110V AC), and the shore power connection (which allows you to plug into an external power source at a campground).
When the switch is in the “on” position, power flows from the batteries to these components, powering your lights, refrigerator, and other devices. When the switch is “off,” the batteries are disconnected, preventing parasitic drain.
Battery Switch Configurations and Performance
Different battery switch configurations offer varying levels of control and functionality. A simple single-battery switch provides a basic on/off function for a single battery bank. More complex switches, like those with multiple positions (e.g., “off,” “battery,” “shore power,” “both”), allow for more nuanced control, enabling you to select the power source (battery or shore power) or combine both.
A dual battery switch, commonly used in trailers with separate house and starting batteries, allows independent control over each battery bank, improving system management and extending battery life. For example, a dual battery switch lets you run appliances from the house battery while keeping the starting battery fully charged for engine operation. In situations where shore power is unavailable, a single-battery switch setup will allow you to use only your house batteries, while a dual-battery setup might require you to manage both banks carefully to avoid depleting the starting battery.
Impact of Battery Switch on Battery Life and System Efficiency
Proper use of the battery switch directly affects battery lifespan and overall system efficiency. Regularly disconnecting the batteries when the trailer isn’t in use prevents parasitic drain, which can significantly reduce battery life. Choosing the right battery switch size is also critical. An undersized switch can overheat and fail, potentially damaging other components in the system. Furthermore, a properly sized switch ensures efficient power delivery, minimizing voltage drops and improving the overall performance of your appliances.
For instance, using a smaller switch than required for your trailer’s load could lead to voltage drops, causing lights to dim or appliances to malfunction. Conversely, an oversized switch provides ample capacity, ensuring reliable and efficient operation even under heavy loads.
Battery Switch Sizing for Electrical Load
Correctly sizing your battery switch is paramount for the safety and longevity of your electrical system. The switch’s amperage rating must exceed the maximum current draw of your trailer’s electrical system. To determine the appropriate size, you need to calculate the total amperage draw of all devices operating simultaneously. This requires adding the amperage ratings of each appliance.
Always add a safety margin (e.g., 20-30%) to account for potential surges and ensure the switch doesn’t overload. For example, if your total calculated amperage draw is 100 amps, you should select a battery switch with a rating of at least 120-130 amps. Using a smaller switch could lead to overheating and failure, posing a fire hazard.
Using a larger switch is generally safe and preferable.
Maintenance and Care of Battery Switches
Keeping your travel trailer’s battery switch in top condition is crucial for reliable power and preventing costly repairs. Regular maintenance ensures smooth operation and extends the lifespan of your switch, protecting your investment. Neglecting maintenance can lead to corrosion, poor connections, and ultimately, battery switch failure.
Battery Switch Maintenance Schedule
A simple maintenance schedule can significantly improve the longevity of your battery switch. This schedule Artikels recommended inspection and cleaning frequencies, tailored to typical travel trailer usage. Remember to adjust the schedule based on your specific environment and usage patterns; more frequent maintenance might be necessary in harsh conditions (e.g., coastal areas with high salinity).
A good rule of thumb is to inspect your battery switch visually every three months and perform a thorough cleaning and lubrication every six months. Annually, you should conduct a more comprehensive inspection, checking for any signs of damage or wear.
Proper Lubrication Procedures
Lubricating the switch mechanism, if applicable, is essential for smooth operation and preventing wear. Not all battery switches require lubrication; some are sealed units. However, if your switch has moving parts (like a rotary switch), use a dielectric grease. Dielectric grease is specifically designed for electrical applications and prevents corrosion while providing lubrication.
Before applying grease, clean the switch thoroughly (see the Cleaning Procedures section below). Apply a small amount of dielectric grease to the moving parts, ensuring even distribution. Avoid over-lubrication, as excess grease can attract dirt and debris.
Preventing Corrosion and Maintaining Optimal Performance
Corrosion is the biggest enemy of battery switches. Salt spray, moisture, and battery acid fumes can quickly degrade the switch’s contacts and internal components. Preventing corrosion requires a proactive approach.
So, you’re planning a trip? Awesome! First things first: get yourself sorted with travel insurance. Check out Aon travel insurance for solid coverage. Then, think about your in-flight entertainment. If you’re an audiophile, you’ll want to nail your audiophile travel setup beforehand; good headphones and a quality DAC can make a huge difference to your journey.
Don’t forget to charge everything the night before!
Regular cleaning is paramount. Use a wire brush to remove any corrosion buildup on the terminals and switch housing. A baking soda paste can also help neutralize acid residue. After cleaning, apply a thin coat of corrosion inhibitor or dielectric grease to protect the metal surfaces. Keep the battery switch area clean and dry, and consider using a waterproof cover if your switch is exposed to the elements.
Finally, ensure proper ventilation around the batteries to minimize the buildup of corrosive gases.
Visual Guide to Battery Switch Components and Maintenance Needs
Imagine your battery switch as a small box with several key components. First, there are the battery terminals: thick, usually copper posts where the battery cables connect. These need regular cleaning to remove corrosion, using a wire brush or terminal cleaner. Next, there’s the switch mechanism itself; this is the part that allows you to switch power on or off.
If it’s a rotary switch, it might have moving parts that need occasional lubrication with dielectric grease. Finally, there’s the switch housing, which protects the internal components. Keep the housing clean and dry to prevent corrosion. Any exposed metal parts should be regularly inspected for corrosion and treated with a corrosion inhibitor if needed. If you notice any loose connections, cracked housing, or signs of significant corrosion, replace the battery switch immediately.
Safety Considerations and Precautions: Battery Switch On Travel Trailer Function
Working with batteries and electrical systems in your travel trailer, while offering convenience, presents inherent risks. Understanding these risks and implementing proper safety procedures is crucial to prevent injury or damage. This section details important safety measures to ensure a safe and successful battery switching experience.
Improper handling of batteries can lead to serious consequences, including burns from acid spills, explosions due to sparking or gas buildup, and electrical shocks. Similarly, working with the electrical system requires caution to avoid short circuits, fires, and electrocution. Always prioritize safety when dealing with these components.
Battery Handling Procedures
Safe handling of batteries depends largely on their type. Lead-acid batteries, common in travel trailers, require specific precautions. Always wear appropriate personal protective equipment (PPE) when handling them.
Lead-acid batteries contain sulfuric acid, a corrosive substance. Spills can cause severe burns to skin and eyes. Therefore, protective eyewear, gloves made of acid-resistant material (such as nitrile or neoprene), and long sleeves are essential. Proper ventilation is also important, as lead-acid batteries release hydrogen gas, which is flammable and explosive. Work in a well-ventilated area, away from open flames or sparks.
Safe Handling of Lithium-ion Batteries
Lithium-ion batteries, while offering higher energy density, present different hazards. These batteries can overheat and potentially catch fire if damaged or improperly charged. Avoid puncturing, crushing, or short-circuiting them. Use only the manufacturer-recommended charger and follow all charging instructions carefully. In case of overheating, immediately remove the battery from the charging device and allow it to cool down in a safe location.
Never attempt to disassemble a lithium-ion battery.
Importance of Safety Equipment
The use of appropriate safety equipment is non-negotiable when working with batteries and electrical systems. This includes, but is not limited to:
- Eye protection: Safety glasses or goggles are essential to protect your eyes from splashes of battery acid or flying debris.
- Gloves: Acid-resistant gloves (nitrile or neoprene) are necessary to protect your hands from chemical burns.
- Protective clothing: Long sleeves and pants protect exposed skin from acid splashes or electrical shocks.
- Insulated tools: Use insulated screwdrivers and other tools to prevent electrical shocks.
- Ventilation: Ensure adequate ventilation to prevent the buildup of flammable gases.
Safety Guidelines for Battery Switching
Prioritizing safety is paramount when working with your travel trailer’s battery system. Failure to follow these guidelines could result in serious injury or damage.
- WARNING: Always disconnect the negative (-) terminal first and reconnect it last when working with batteries. This minimizes the risk of accidental short circuits.
- WARNING: Never work on electrical systems while the batteries are connected. Disconnect the batteries completely before starting any work.
- WARNING: Inspect batteries regularly for corrosion, damage, or leaks. Replace damaged or leaking batteries immediately.
- WARNING: Keep batteries away from open flames, sparks, and sources of ignition.
- WARNING: Never attempt to jump-start a battery with a different voltage rating. This can cause damage to the battery and potentially create a fire hazard.
- If you are unsure about any aspect of working with your batteries or electrical system, consult a qualified technician.
Mastering your travel trailer’s battery switch is more than just flipping a switch; it’s about understanding your RV’s power system and ensuring safe and efficient operation. By following the safety guidelines and maintenance procedures Artikeld here, you’ll extend the life of your batteries and prevent costly repairs. So, get out there and enjoy the open road with confidence, knowing you’ve got your electrical system under control!
Question Bank
What happens if I leave my battery switch on all the time?
Leaving the switch on constantly can drain your batteries, especially if you’re not connected to shore power. It’s best to turn it off when not using the trailer.
How do I know if my battery switch is bad?
Symptoms of a bad switch include no power to appliances, flickering lights, or a burning smell. Inspect for corrosion or loose connections. If problems persist, replacement might be necessary.
Can I use any type of battery with my travel trailer?
Not all batteries are created equal. Check your trailer’s manual for compatible battery types and amperage ratings to avoid damage to your system.
How often should I clean my battery switch?
Regularly inspect and clean your battery switch, at least once a year or more frequently in humid climates, to prevent corrosion buildup.
